Restore with the Restore Utilities
Before you begin
When restoring backup files, Clinical and Clinical must be closed.
Files you are restoring will overwrite any existing files of the same name in your database. MedicalDirector recommends you carefully check the restore file names for any conflicts of file names in your database before commencing.
Procedure
-
Double-click the MedicalDirector Maintenance icon
 on
your desktop.
on
your desktop.
-
Locate and double-click the Restore icon
 within the Common
(Maintenance Tasks) section of MedicalDirector Maintenance. The
MedicalDirector Restore window is displayed.
within the Common
(Maintenance Tasks) section of MedicalDirector Maintenance. The
MedicalDirector Restore window is displayed.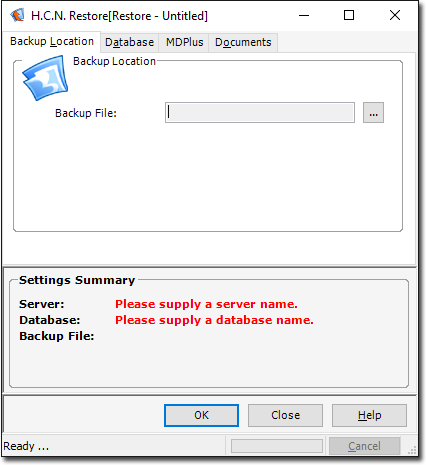
- Select the Backup Location tab. When you first open the Restore Utility, you are presented with a blank configuration, awaiting your input. Until you specify which backup file to restore, both the Server and Database fields are blank, waiting on input. These fields are populated automatically when you select a backup file to restore. Until you specify the backup file to restore, both the Database and Documents tabs are disabled. These tabs become active on selection of a backup file to restore.
-
Click
 to locate
and select the MedicalDirector Backup file you wish to restore. If the backup was created
on a different machine the following prompt is displayed.
to locate
and select the MedicalDirector Backup file you wish to restore. If the backup was created
on a different machine the following prompt is displayed.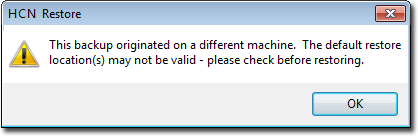
If you wish to restore this backup to your machine, the documents and letters configuration will need to be modified. For more information, refer to Configuring Documents Settings After Restoring. - Double-click on the Backup file to be restored, or select the Backup file and click Open. You may be prompted to enter a password for the backup if one was originally created for it.
-
Select the Database tab to check or change the Database Details.
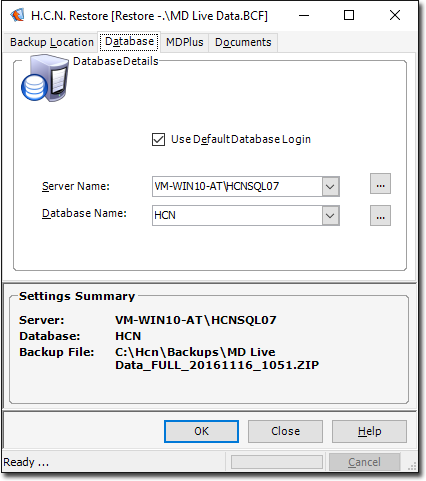
The Database Tab allows you to restore the backup file to its original location. It also allows you to restore the backup file to a different existing server and any database name if required.- To restore to your local machine, click beside the
Server Name field and select local from the list displayed.
- Enter a new database name or click beside the
Database Name field and select an existing database from the list
displayed.
- To restore to your local machine, click
- Select the Plugins tab to select which Plugins you wish to restore.
-
Select the Documents tab to check documents or folders.
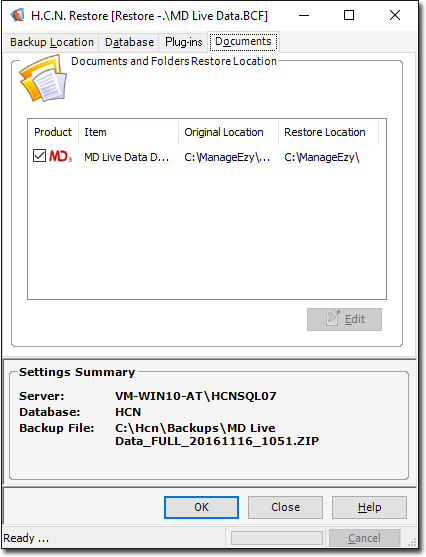
To restore documents to a new location, refer to Restoring Documents.Ensure you have check all the settings in the Restore tabs are correct before clicking the OK button.
-
Click OK to begin the restore process.
Restoring Documents
If you are restoring backup from MedicalDirector Clinical v3.6 (or later), you must select a location that represents the type of backup you are trying to restore, i.e.;
- For live data, use \hcn
- For mobile data, use \hcnmobile
- For the supplied sample data, use \hcnsample
- To change the restore location path, select the restore item from the list provided, and then clickEdit. Enter the path in the window that appears.
- Click OK to begin the restore process if the documents or folders are to be restored to the original location.
-
To restore the item to a different location, select the item and click
Edit. The Restore Details window
appears.
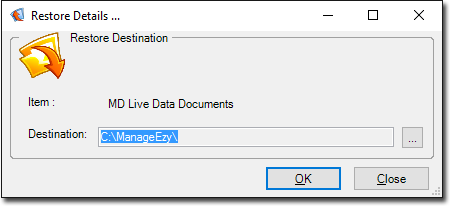
-
Click Ellipsis
to browse for your specific location.
-
Click OK to accept the selected location. The new restore location is displayed next to the item in the Restore Location field.
Ensure you check all the settings in the Restore tabs are correct before clicking the OK button.
- Click OK to begin the restore process.