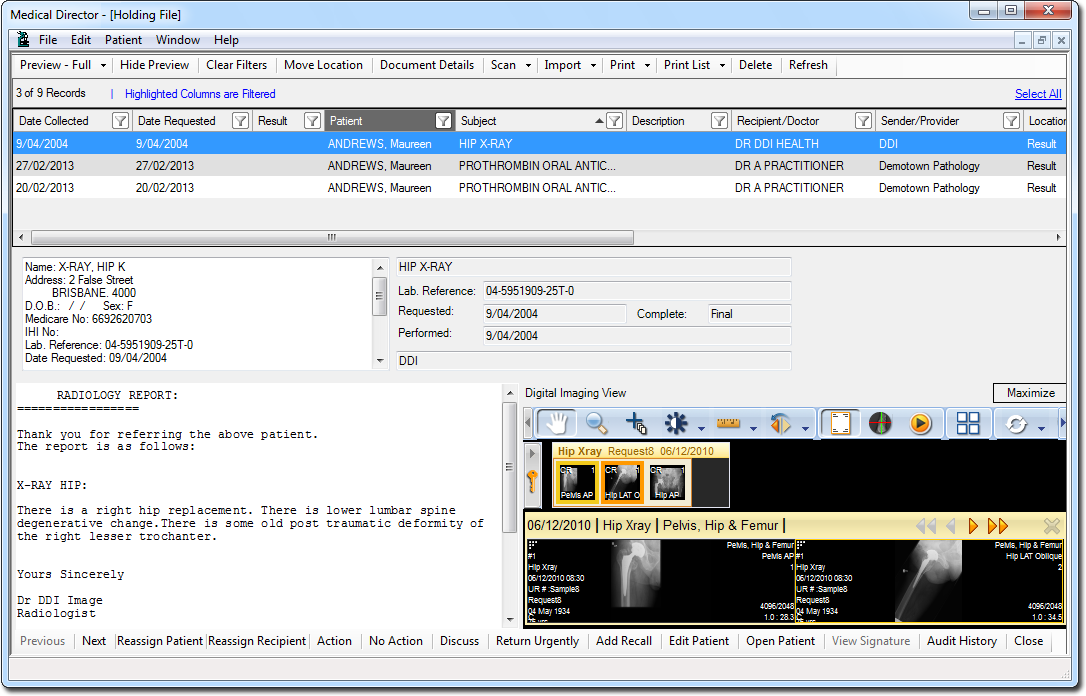
Viewing Images
Images are viewed by selecting them from within the patient's Clinical Window, or via the Holding File when checking new results. When viewing such results from the Holding File, you can click Maximize to expand the DDI Image browser.
| Mouse Functions | |
 |
Control the contrast and brightness of the image, by clicking and holding down the right mouse button, and then moving the mouse forward/backward. |
 |
Re-position (drag) the image displayed on screen, by clicking and holding down the left mouse button. |
 |
Zoom the image in or out, by clicking and holding down both mouse keys, and then moving the mouse forward/backward. |
| Click the Maximise button in the DDI Image Browser to access the following tools | ||
| Re-position (drag) the image displayed on screen. | ||
 |
Zoom the image in or out by clicking and dragging the mouse. | |
 |
Select from a range of present brightness settings. | |
 |
Ruler tool. | This set of tools is available from within the same menu item. Each tool is manipulated by clicking and dragging your mouse within the confines of a given image. |
 |
Angle tool. | |
 |
Region of interest tool. | |
 |
Ratio tool. | |
| Arrow (Text) tool. | ||
 |
Text tool. | |
 |
Flip the image horizontally. | This set of tools is available from within the same menu item. |
 |
Flip the image vertically. | |
 |
Rotate the image clockwise. | |
 |
Rotate the image anti-clockwise. | |
 |
Show/Hide the DICOM overlay. | |
 |
Show/Hide cross-reference lines | |
 |
Step forward through the set of images. | This set of tools is available from within the same menu item. |
 |
Step forward to the next series of images. | |
 |
Allows you to specify how many images appear simultaneously on-screen. | |
| Resets the image to the initial viewing state. | ||
 |
Manage personal preferences such as mouse sensitivity for window centre/size and scrolling images, image quality and image interpolation. | |
 |
Print to plain paper. | |
| Items of Interest on this Window Note: the range of options available to you will be limited by the level of access you have. |
|
| Upper Section | |
| Hide Preview | Shows/Hides the display of a selected Result's details. |
| Preview | Toggles the viewable region of a selected Result between full mode, or right/bottom modes. Document types not supported by Clinical will open in the default associated program instead. |
| Move | Click to move selected Results to a specific tab within the patient's record. You can select from the 'Documents', 'Letters' or 'Results' tabs in the Clinical Window, or the ECG tab of the Tool Box. |
| Details | Click to edit the details of a selected Result. |
| Scan | Click to scan a document directly into the Holding File, after which you can assign the document to a patient, via the Properties button (see above). |
| Import | Click to import a document directly into the Holding File, after which you can assign the document to a patient, via the Properties button (see above). |
| Print List | Click to print a list of ticked documents. Note that the details of the selected Results are not displayed on the printout. |
| Delete | Click to delete ticked entries. |
| Refresh | Refreshes the Holding File Results list. |
| Clear Filter | Only visible if a filter has been applied. Right-click the top of each column to select filtering options. Click the 'Clear Filter' button to clear all filters. |
| Lower Section | |
| Previous/Next | Click to scroll through the list of Results, displaying the details of each, one-by-one. |
| Assign/Reassign Patient | Assigns the selected result to the patient. If no matching patient record can be found, you will be prompted to either add a new patient or search for an existing patient to match the result to. |
| Assign/Reassign Recipient | Click to assign the selected Result to a specific recipient. If the Result is already associated with a recipient, clicking this button allows you to assign it to another. |
| Action | Calls the Action window, which allows you to indicate which sort of action you would like to take regarding this Result. Such actions include 'Discuss', 'Return Urgently' and so forth. You can also create customised Actions, which will be saved for later use. For more information about Actions, see Adding Results Manually. |
| No Action | Click to indicate that no actions are required regarding the selected Result. |
| Discuss | Click to indicate that you wish to discuss the result with the patient. |
| Return Urgently | Mark the selected item as 'Return Urgently'. |
| Add Recall | Click to create a Recall notification for the patient. |
| Edit Patient | If the demographic details on the Result are incorrect, i.e. they do not exactly match an existing patient in the database, you can edit the demographics in the result by clicking this button. Modify the details as required, ensuring that the information is correct for the intended patient. After editing, MedicalDirector Clinical will try to rematch with a patient in the database. |
| Open Record | Click to open the patient's clinical record. |
| View Signature | Click to view details about the digital signature used for a selected e-mail in the Holding File, imported via MDExchange . |
| Audit History | Toggles half of the viewing area to display an audit trail of changes made to a selected Result. The following events are tracked: When a record is assigned or reassigned to a patient. When a record is assigned or reassigned to a recipient. When a notation of 'No Action' is applied to a result, and by whom. When a notation is applied to a result, and the comment that is recorded against it. The name of the user who recorded a notation. When a record is moved between tabs in the patient's clinical window, the 'from' tab and 'to' tab are recorded, and the name of the user who moved the record. When a record is flagged as being 'Notified/De-notified', plus the name of the user who made the change, and the date on which this occurred. The name of the user who conducts a scan. The name of the user who imports a result. |