Printing Prescriptions
Print prescriptions.
Before you begin
 Print icon on the Current Rx tab,
* Asterisk column.
Print icon on the Current Rx tab,
* Asterisk column.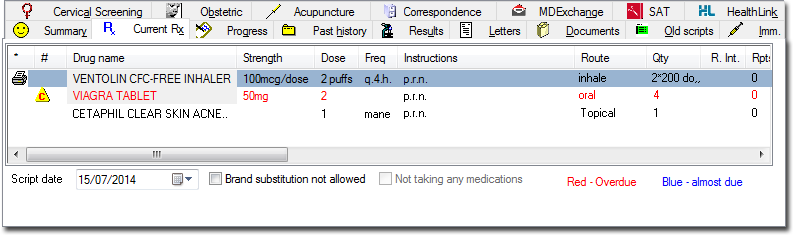
This Print icon is automatically set when prescribing new
medications, as it is assumed you want to print the script at the time of the patient's
visit.
Procedure
- To select or deselect an existing item for printing, double-click the drug's name in the current medication list. If you are using the keyboard, select the desired item using the arrow keys and press ENTER to toggle the printing status. You can select as many items as you like for printing, and mix PBS, Authority, RPBS and Non-PBS items; these will be sorted automatically before printing to ensure that each type of prescription is printed separately.
-
Once you have selected all the items for printing, to send the selected
prescriptions to the printer, either:
- Click Print icon in the toolbar
- Press the F9 key
- Type Ctrl + P
- Close the patient's record, at which time you will be prompted to print the
scripts.
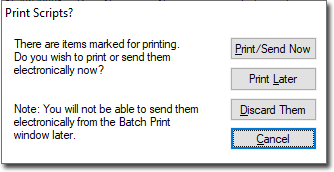
- Click Print later to print later using Batch Printing.
- Click
Results
If the printer is on and loaded with paper, the script prints.
In accordance with PBS regulations, only 3 items are printed on each prescription.
Items of different types (PBS, RPBS, Non-PBS) are automatically sorted onto separate prescriptions.
Only a single Authority and Schedule 8 item is printed on a prescription.
Any Pension, DVA or Safety net numbers in the patient's file are added to the script at the time of printing where appropriate.
After printing, the Print icon next to each printed medication
is removed. Any items that were selected as hand-written prescriptions are not printed,
but are recorded on the Old Scripts tab.