
Set up your printers to print on prescription forms, pathology and imaging forms and
so on, or for plain paper printing
Before you begin
Ensure printers are set up on each computer where Clinical is
installed.
You can direct each type of printing to a single printer with multiple trays or up to
four different printers on your network.
About this task
Configure the available printer for each service in the
Printer Setup tab.
Procedure
To set up your printers:
-
From the MedicalDirector Clinical Homepage, select .
-
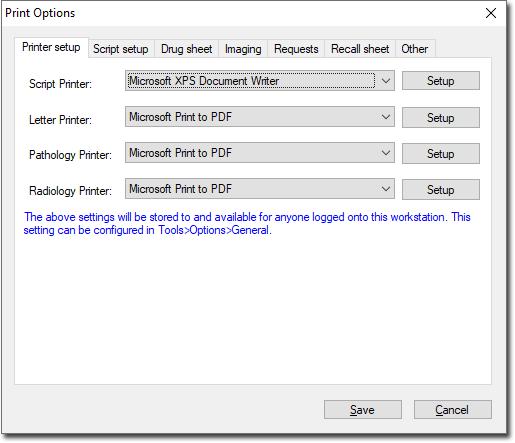
In the Print Options window, select the Printer
Setup tab.
-
On the Printer setup tab, select a printer from the list for
each of the following services:
- Script Printer - for
Prescriptions. For more information, refer to Printing Prescriptions.
- Letter Printer - for plain paper printing, such as
Summaries and Assessments.
- Pathology Printer - for Pathology
Requests.
- Radiology Printer - for Imaging
Requests.
Tip:
- The list only displays printers that are installed on your network and that
you have permission to use. If you need assistance, contact your System
Administrator.
- If you do not specify a printer for any of the services, MedicalDirector Clinical defaults to your Windows default printer.
-
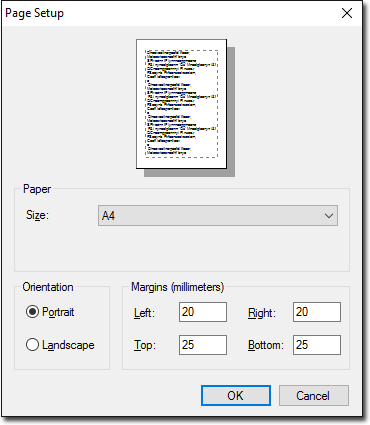
If required, to specify the page setup for a printer, click the
Setup next to it. In the Page Setup
window, configure the following fields:
- Paper - select the required paper size.
- Orientation - set to either
Portrait or Landscape.
- Margins - enter the required margin values.
Measurements are in millimeters (mm).
-
Click OK to confirm your settings.
-
Click Save.
Results
The selected printer name is assigned to the respective
service. These settings are stored and available for anyone logged in to this
workstation.